2.3 A brief introduction to RStudio
2.3.1 The console
When you first start up RStudio, it will likely look something like Figure 2.1.

Figure 2.1: RStudio desktop software
The area on the left is an interactive console, where you can type in commands and see the responses in real time. You can type in an arithmetic calculation such as 7 + 52 followed by the Enter key, or get the system date and time with Sys.time() and Enter.
Are you wondering why there’s a period and parentheses in Sys.time()? Sys.time is an R function. The function happens to have a period in the function name; that dot doesn’t have any additional significance the way periods do in some other languages. The parentheses after the function are more important - they mean you want to run Sys.time as a function. (If you type a function’s name without the parentheses, R will show you the code behind the function instead of actually executing the function.)
If you click the up arrow on your keyboard while your cursor is in RStudio’s console, the console will show the most recent command you’ve typed – quite handy if you want to repeat a command you just executed or modify an earlier command. Click the up arrow more than once and the console will show earlier commands. In addition, if you begin typing something in the console and hit control and the up arrow on Windows or command and the up arrow on Mac, you’ll get a list of past commands you’ve typed that start with those characters. Control/command up arrow in the console at a blank line gives you a drop-down list of 20 or so most-recent commands.
Typing in a line like 7 + 52 is fine if you just want a quick calculation or two, but most of the time you’ll want to be doing something more complex. If you go to File > New File > R Script in the RStudio menu, you should see another pane open on the left above the interactive console. This is where you can write a lengthier script with lots of lines of code, and save the file for future use.
Like in many Windows and Mac software programs, you can open multiple files in RStudio and each will have its own tab (which, just as in Excel or most browsers, can be dragged and dropped to re-order).
2.3.2 Other RStudio panes
The two panes on the right become useful as you create and run your code. In the top right pane, one tab shows your R Environment – what objects are loaded into your session at the moment. If you’re new to programming, don’t worry; this will make more sense once you start coding.
Another tab shows your command history. So if you typed 7 + 52 into the console, if you go to the History tab, you should see that in the history tab. You can select one or more lines in the history tab and then click the “To Console”" button at the top of the pane to send the line(s) back to the console, or the “To Source” option to send them to the top-left script pane.
You can search the history pane as well (you should see a search box at the upper right).
The lower right pane has several different, useful tabs. The first is a Files tab, similar to Windows File Explorer or Mac Finder. Although not quite as robust as those, this area is convenient for quickly renaming or deleting files, opening files, or changing your working directory.
The Plots tab is where you can view graphs and other data visualizations you create in R.
The Packages tab shows what packages are 1) available for you to use and 2) actually loaded into your working session. Anything listed is on your system; anything with a check mark to the left of the name is currently loaded in memory.
Finally, Help is where you can view help files for functions and packages. You’ll likely be using that a lot, no matter how expert you become in R. If you click the home button on the help tab (it’s the house icon), you’ll see links to a lot of general R and RStudio information – some of it for beginners, some considerably more advanced. But you can also ask for more specific help in the R console for functions and packages, and search for help by keyword. (I’ll show you how later in this chapter.)
2.3.3 RStudio Projects
RStudio is what’s known as an IDE, or Integrated Development Environment. That’s tech-speak for “software designed to make life easier for programmers.” One common feature of IDEs is projects. In RStudio, opening a project automatically sets you up in the project’s working directory, making it easier to find files stored in that directory.
Projects also keep track of which files you left open, so they’ll still be open the next time you launch the software and open your project. Command history is different for each project as well, so you can scan through past commands that you typed just specifically for that that project. There are some other useful features in projects as you get more familiar with the software.
You can create a new project by going to File > New Project. You’ll be given three choices: New Directory (for a brand new project with nothing in it), Existing Project (to create a project from an existing directory that might already have files in it), and Version Control. If you’ve programmed before and are familiar with version control, you can create local files from a Git or Subversion repository. Project options at Tools > Project Options also let you easily create a version control repo for your project. I won’t be covering version control in this book, but if it’s of interest, there’s some handy version-control integration within RStudio. (Jenny Bryan, formerly a professor at the University of British Columbia now with RStudio, has a nice roundup of using git with R and RStudio at happygitwithr.com.)
For now, create a new project with File > New Project. Select New Directory and then the first option, Empty Project: Create a new project in an empty directory. You’ll be asked to name your new directory - perhaps call it something like testproject or R4CommBook. Leave “Create a git repository” and “Use packrat with this project” unchecked.
You should end up with an RStudio session that looks something like this:
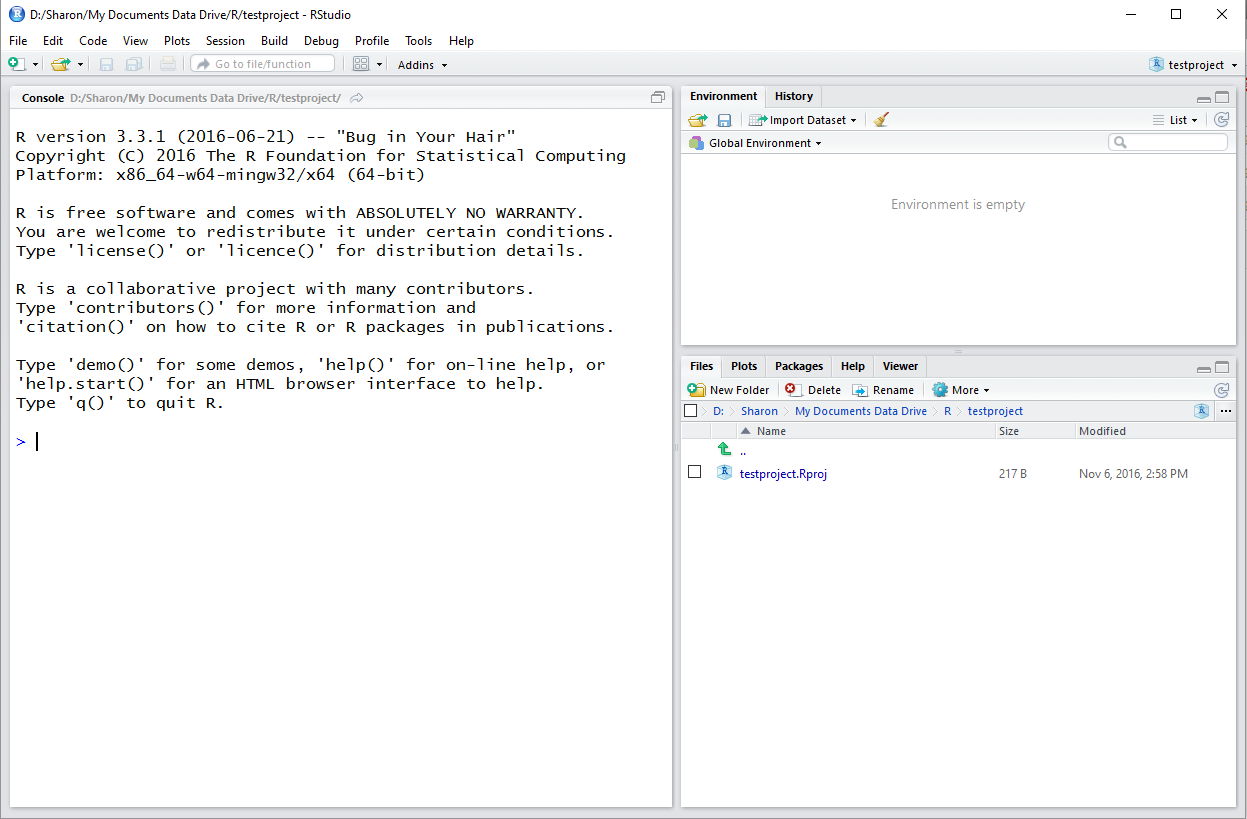
Figure 2.2: New project in RStudio
Now it’s time to write a little code.